2 / 12 / 12
Read the ORIGINAL POST HERE
This is a very wordy and picture-ey tutorial because it is a pretty involved process, so please bear with me! I’ll break it into four parts:
Tips,
Starting the Base,
Working the First Row of Loops,
Making the First Row of Lace.
Tips for Broomstick Lace
Be patient with yourself. Broomstick lace has a bit of a steep learning curve because it is so awkward. Take heart! Practice makes perfect, as they say.
Pull your lace loops snugly around whatever lace tool you are using, but not too tight.
If you are a beginner, I suggest using a synthetic or synthetic blend yarn. Anything with a little give and stretch will be easier to work with.
This tutorial shows my way, using this pin. This is not the only correct method. There are many different ways to make broomstick lace, so do what feels right for you. Here are some other methods: video by Crochet Geek, picture tute at Crochet Cabana, picture tutorial at Crochet Spot, picture tutorial at Kootooyoo.
You can make your own pin, like I did, or you can purchase one here. You can also use a broomstick, a ruler, a knitting needle, a pipe, or a turkey baster.
You may want to use a lifeline. You can read about how to do that here.
Inevitably, once in a while you will discover that you are one loop short. That’s okay – just make the correct number of single crochets in your lace loop groups and keep going.
Starting the Base
You can start your first “loop” row right after you make your chain, but I find it is easier to make a more sturdy “base layer” with a row of single crochet.
First, you must determine your multiple.
Decide how many loops you want for each of your lace groups – it can be any amount.
Then, decide how many lace groups you want/how long you want your row to be.
Here is the formula for your beginning chain: (number of loops per group× number of lace groups) + 1.
For this tutorial, I decided on five loops per grouping and I want four groups.
So, my formula looks like this: (5× 4) + 1 = 21.
Chain 21, then single crochet in the second chain from the hook, and in each remaining chain to the end.
If you are following this example, you will have 20 single crochets for a base (do not remove your hook):

Working the First Row of Loops
After you finish your base row of single crochet, pull up a big loop with your hook (through the last stitch you just made). This loop will already be there, you just need to yank it up:

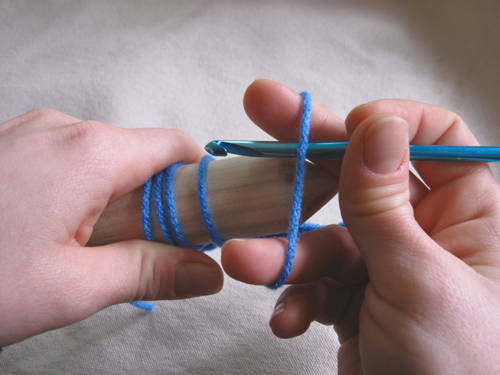
Remove your hook and set it aside for now. Grab your pin or lace tool and insert it through the loop you just made. Pull the ball-end of the yarn to make the loop snug (but not tight!) around the pin:

Okay, here’s where everything gets awkward. I’m going to show you what works for me, but you very well might come up with a way that works better for you. Do whatever is most comfortable/makes most sense to you! Weave the yarn through your fingers, as you would normally do for controlling tension, and slide your hand up to meet the pin. Grasp the pin. I am right-handed, so my yarn and pin are in my left hand:


For “loop” rows, always work through the back loops only of the single crochets. You will pull up a loop for each single crochet from the previous row (so for this example, I will have 20 loops at the end). Insert your hook through the back loop of the next single crochet and grab the ball-end yarn that is wrapped through the fingers:

Pull that yarn through – make the loop as big as you want – and at the same time, slide your middle finger down the hook so it is also in the loop:

Next, insert your ring finger into the loop as well. Now you have the hook, your middle finger, and your ring finger all inside the loop:

Spread your ring and middle fingers apart to open up the loop and guide it onto the pin:
Snuggify the loop around the pin. Most likely, you will have to readjust your hands and yarn a bit now. That’s okay – just get back into position for the next loop. With some practice, all of these steps become more fluid and easy:

Continue making a loop for each of your single crochets until you get to the end (20 loops here):

Set your hook aside for now, and carefully pull the pin out completely. Here is an in-progress-pin-removal:

Making the First Row of Broomstick Lace
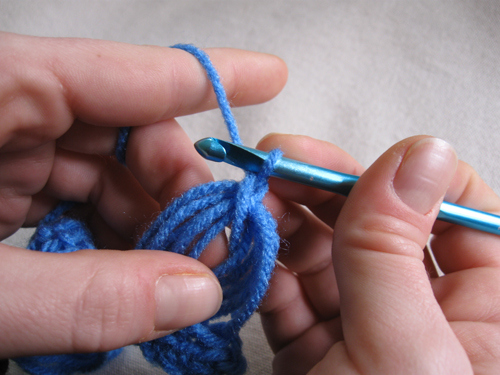
And now, the moment we’ve been waiting for, the first lace group! Grab up your hook again and insert it through the first five loops, pulling them a little taut. Now get your ball-end yarn in working order through the fingers of your left hand:

To start the very first lace group of each row, we’ll need to “lock” it in place with a slip stitch. Grab the ball-end yarn with your hook:

Now, pull up the yarn through all five loops:

Yarn over:

. . . And pull it through to finish the locking slip stitch. This slip stitch does not count as a single crochet:
Because our lace groups are five loops deep, we need to make five single crochets into each group. Insert your hook through the “eye” of the lace group:

Grab the yarn from behind the lace group:

Pull it through:

Yarn over:

. . . And pull the yarn through both loops on your hook to complete the first single crochet:

Continue to make single crochets through the eye of the lace group until you have five single crochets:

For the rest of the lace groups, you do not have to make a locking slip stitch. Insert your hook through the next five loops, making sure they aren’t twisted, and that they’re all facing the same direction:

Yarn over:

. . . And pull the yarn through:

Yarn over again and pull the yarn through both loops on your hook to complete the single crochet:

Continue making five single crochets in each group of five loops to the end. You’ll have 20 single crochets and four lace loop groups. Do not remove your hook:

Pull up a big loop, take up your broomstick lace pin, and start all over again. Repeat to your heart’s content:

Crochet Pattern: Infinity and Beyond Broomstick Lace Scarf
Read the ORIGINAL POST HERE and HERE


No comments:
Post a Comment