Knit Purl Hunter Video Lessons
(Sorted Alphabetically)
For your convenience all Knit Purl Hunter video lessons are listed here in alphabetical order. Just click on any of the titles below to view that post’s video. If you prefer to view a list of my video lessons by category click here
.
Monday 31 August 2015
Sunday 30 August 2015
How To Attach Yarn Using the Russian Join
READ ORIGINAL POST HERE
from Crochet Nirvana

It's Easy - Really!!
Let's face it. Attaching new yarn is a pain. When I started crocheting I did my best to avoid it. Unfortunately that lead to some small, plain projects. Eventually I faced my fear and made a striped hat. It's not real pretty, but it helped me get the hang of adding color to my world. The hardest part was having faith that I didn't need to tie a knot. I worried that everything was too loose. I realized that after working a few rows the join tightened up on its own. Hooray! It took practice, but now I don't panic when I get to the end of a ball of yarn, or avoid patterns that have more than one color. Then I started knitting. Now I have to learn how to attach new yarn all over again! There are different techniques depending on what kind of needles you use. It's challenging because it's new, but I'm sure that with practice it will get easier. There is one thing that's the same - the loose ends. No matter what you do or how you do it there are going to be ends that need to be woven in. This is my least favorite part of knitting and crochet. I procrastinate and leave it until the end, and I always worry that it's going to come undone and my hard work will unravel right before my eyes. I don't think I'm alone in this - am I?
Then I heard about the Russian Join. It sounded really difficult, like it involved weaving and grafting and maybe even a little magic. It also seemed too good to be true. A clean join with no ends to weave in? Nonsense! So for a long time I steered clear. Until a few months ago when I stumbled across this post and decided to give it a try. It was so easy, the results were beautiful and you know the best part - no ends to weave in!! It's not appropriate in every situation, but now whenever possible this is my go to method. Even if you don't think you'll like it, I encourage you to give this a try. Just once, and see if it doesn't become a favorite in your bag of tricks!
Here's how you do it:


Once your yarns are joined and stitched into the fabric it's nearly impossible to tell where the breaks are.
Take a look at this fingerless mitt. I actually had to mark where the join was after I did it because I was afraid if I didn't by the time I was ready to take the picture I wouldn't be able to find it again! Once the join is made, it feels really secure when you tug on it and I'm not concerned at all about it coming undone.
For me the best part is no ends!
Yesterday I was working on a pair of socks and I used the Russian Join to add a new ball of yarn. Not more than a yard into it I came to a knot. (I just hate that, don't you?)
Anyway, I wasn't about to let that knot ruin the sole of the sock so I clipped it out and fashioned myself another Russian Join.
It took a few extra minutes, but in the end I was able to knit straight through. Now there are no lumps in the bottom of the sock and the only ends that need to be woven in are from when I cast on and after I bind off.
Russian Join
READ ORIGINAL POST HERE
From twist Bloggish Bits
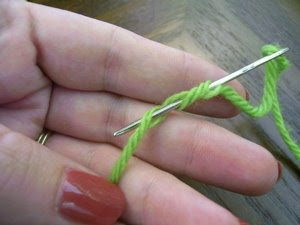
Today, I'm going to give you a tutorial on the Russian Join. A Russian Join is a way to start a new ball of yarn without weaving in ends!
The Russian Join is particularly helpful when:
You are joining non-felting yarn (to use instead of a spit-splice)
You are joining fine-weight yarn, such as fingering or lace weight
You are conserving yarn - there's very little waste.
Keep in mind - the yarn will be slightly thicker where the join is, and may show, depending upon your stitch pattern. So far, I haven't had any unsightly effects using this join, and I use it frequently!


Pull the ends of the yarn so that your loops close, but don't pull tight. You want the yarn to lay flat and not bunch up.

Trim the ends close to the yarn join.

Continue knitting or crocheting.
After you have worked through this join, tug your fabric a bit lengthwise & width-wise.
A couple of ends may poke out.
Just trim them down, eventually they'll work to a resting place.
From twist Bloggish Bits
Today, I'm going to give you a tutorial on the Russian Join. A Russian Join is a way to start a new ball of yarn without weaving in ends!
The Russian Join is particularly helpful when:
You are joining non-felting yarn (to use instead of a spit-splice)
You are joining fine-weight yarn, such as fingering or lace weight
You are conserving yarn - there's very little waste.
Keep in mind - the yarn will be slightly thicker where the join is, and may show, depending upon your stitch pattern. So far, I haven't had any unsightly effects using this join, and I use it frequently!


Pull the ends of the yarn so that your loops close, but don't pull tight. You want the yarn to lay flat and not bunch up.

Trim the ends close to the yarn join.

Continue knitting or crocheting.
After you have worked through this join, tug your fabric a bit lengthwise & width-wise.
A couple of ends may poke out.
Just trim them down, eventually they'll work to a resting place.


Subscribe to:
Posts (Atom)