Fun with pockets ~ a tutorial
Link to the ORIGINAL POST HERE

Here is what you'll need to make your pocket(s).
I've used contrasting color wool for the inside, but if you'd rather keep to all one color, then disregard the second color.
For demonstration purposes i've made a swatch.
Before cutting into your sweater, i would suggest always making a swatch to practice on first, you'll want to determine where the pocket should be, then find the center on the sweater (swatch).
It's easy to just look, but if you like you can add pins to mark the placement.

If you pull your swatch apart, you'll be able to see the stitches a bit clearer.
Do you see the double vertical bars? the upside down v?
Choose one in the top center of where you'd like your pocket opening to be.


Lift the stitch so you isolate just one.


Now it's time for the scissors

Making sure you have just the one stitch
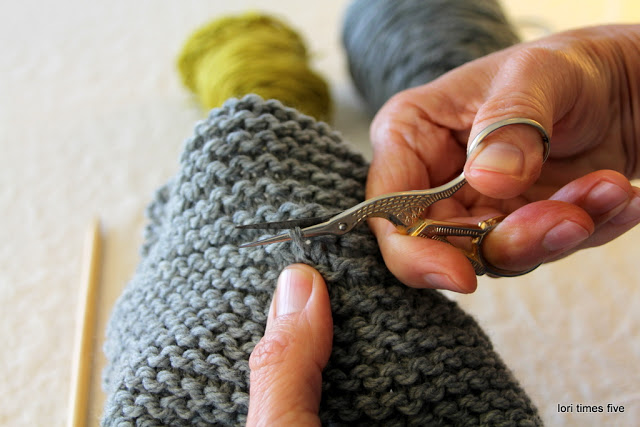
Make the cut


Next, begin unraveling. delicately, pull the cut thread, from one side, then the other. (remember, your working from the center.

Having already determined the length of your pocket, only unravel as many stitches as you want your pocket.

Again, carefully, without pulling, pick up the bottom stitches. these will be the top of the pocket. do not cut the unraveled wool, these will be woven in at the end

Here we have nine stitches picked up. now turn your swatch over to pick up the stitches for the back

Now we're on the back side, picking up the stitches from the bottom (which is really the top of the pocket) don't worry, if that doesn't make sense, i promise it will.

You should have the same number of stitches, here we have nine on the front of the pocket, and nine on the back

Now on the back, using a contrasting color if you like, attach your yarn to the first stitch on the needle, and begin to knit across the row.
Here i used a silky merino held double.
It's a good idea to use a yarn with a similar weight if you'll be adding a second color.

Keep knitting until your pocket is the the length you want

Here is how the backside will look, see how the top stitches that you picked up are knit down?

When you get to the desired length, bind off, and come back to the front

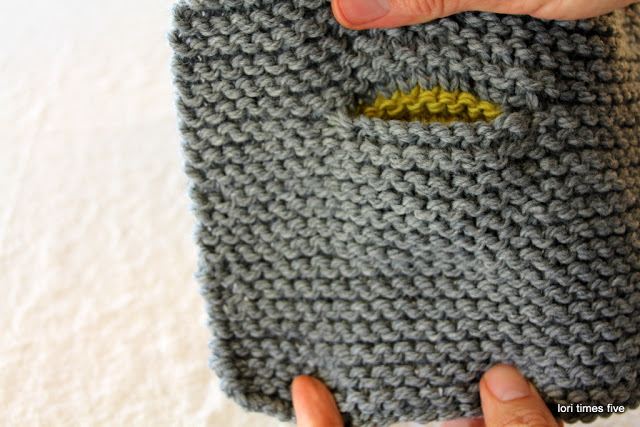
Front of work, with the green hiding behind


Now attach the main color yarn to the first stitch and knit one row across

Then bind off, and the front is done

It's already beginning to look like a pocket

Now it's time to seam and stitch your pocket down

Using the main color wool, split your plies and use one to sew with

Starting at the top right corner begin seaming. you will of course be much neater than i am here, the light was fading fast, and i wanted to finish up while it was still good!

But you can see what needs to be done.
Sew all the way around your pocket, picking up just the backside of the knit stitch. this is so your stitches won't show on the front.
Sometimes it might be necessary to split stitches. It's okay


It wasn't so scary after all and now you'll have a place for your treasures.
One of my favorite posts, is about these things (treasures and pockets), and it's titled, very originally, pockets (there is knitting too)

If you'd like more of a hidden pocket, when your using a contrasting color, just knit the first two rows on the back side with the main color yarn, then add the contrast

No comments:
Post a Comment