MAGAZINE

This "magazine" pretends to be a compilation of the best articles in knitting and crochet.
It is a virtual "note book" for the avid knitter and crochetter ... always needing to learn more.
Please read my HOME PAGE


Showing posts with label Lace. Show all posts

Tuesday, 1 August 2017

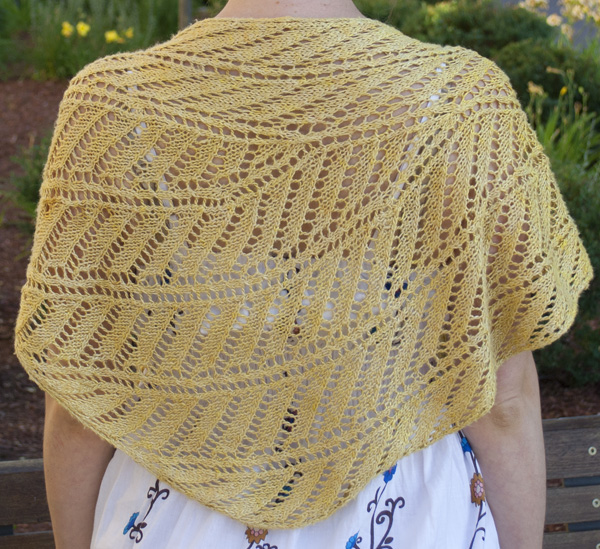
Mochi Plus Shell Lace Stole

Designed & Knit by Barbara Breiter

https://web.archive.org/web/20161207054124/http://www.straw.com/cpy/patterns2/accessories/MochiPlus-ShellStole.html

This beautiful lace shawl is knit in a wonderfully soft, slow striping Mochi Plus yarn. The rectangle design means no shaping so the simple lace pattern is easy to work and it is knit in the lengthwise direction.

Sizes:
Prior to blocking: 67" wide x 20" long
After blocking: 70" wide x 22" long

Gauge:
3.5 sts=1" in St st

Materials:
Crystal Palace Bamboo 35" Circular Size 11 US (8 mm)
8-50 gr balls Crystal Palace Yarns Mochi Plus #553 Violets Rainbow

Instructions
CO 238 sts.
K 2 rows, slipping first st of every row.
Begin pattern Rows 1-12 below, slipping first st, k the next two sts, work pattern to last 3 sts, k3 every row.
Row 1 (WS) and all WS Rows: Purl.
Row 2: K2tog, *k5, yo, k1, yo, k2, sl 1, k2tog, psso; rep from *, end last repeat ssk instead of sl 1, k2tog, psso.
Row 4: K2tog, *k4, yo, k3, yo, k1, sl 1, k2tog, psso; rep from *, end last repeat ssk instead of sl 1, k2tog, psso.
Row 6: K2tog, *k3, yo, k5, yo, sl 1, k2tog, psso; rep from *, end last repeat ssk instead of sl 1, k2tog, psso.
Row 8: K2tog, *k2, yo, k1, yo, k5, sl 1, k2tog, psso; rep from *, end last repeat ssk instead of sl 1, k2tog, psso.
Row 10: K2tog, *k1, yo, k3, yo, k4, sl 1, k2tog, psso; rep from *, end last repeat ssk instead of sl 1, k2tog, psso.
Row 12: K2tog, * yo, k5, yo, k3, sl 1, k2tog, psso; rep from *, end last repeat ssk instead of sl 1, k2tog, psso.

Rep Rows 1-12 6 more times; stole should measure about 20" long.
P 2 rows.
BO knitwise loosely.
Block.

Designed by Barbara Breiter - visit her site for many more patterns - www.knitabit.net

Crystal Palace Yarns 160 23rd St, Richmond, CA 94804
phone: 510-237-9988, fax: 510-237-9809 email: cpyinfo -@- straw.com

copyright 2009 Crystal Palace Yarns/Straw Into Gold, Inc. - We are happy to share this free knitting pattern with knitters. The pattern may be used for non-commercial personal or knitting guild use. It is not to be used in any publication in print nor should it be reproduced in electronic/digital format or elsewhere on the Web without permission. Knitting shops carrying CP Yarns Mochi Plus are welcome to print and share this pattern with customers of our yarns.


Wednesday, 7 October 2015

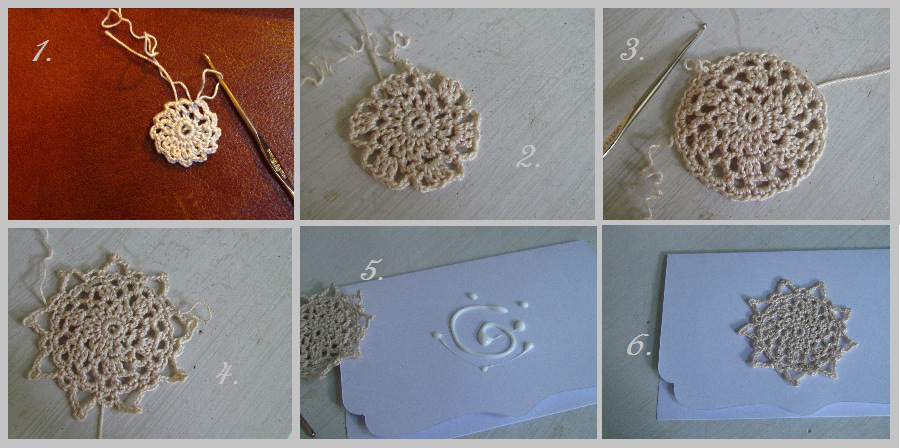
Lace Greeting Card Tutorial

Posted by Melody on May 27, 2012

READ ORIGINAL POST HERE


http://www.melmariadesigns.com/lace-greeting-card-tutorial/


Ch 6, join with sl st to form ring

Rnd 1: Ch 1, 12 sc in ring, join to first sc.

Rnd 2: Ch 4, (counts as sc, ch 3), *sc in next sc, ch 3, repeat from * around, sl st in 1st ch of beg ch-3.

Rnd 3: Sl st into ch-3 sp, ch 1, sc in same sp, *ch 3, sc in next ch-3 sp, repeat from * around, join with sl st in first sc.

Rnd 4: Sl st into ch-3 sp, ch 1, sc in same sp, *ch 3, 3 dc in next ch-3 sp, ch 3, sc in next ch-3 sp, repeat from * around, join with sl st in first sc.

Rnd 5: Sl st in next ch-3 sp, ch 3, *sc in center dc of 3-dc, ch 3, (sc in ch-3 sp, ch 3) twice, ch 3, repeat from * around, join with sl st in first sc.

Rnd 6: Sl st in next sp, ch 1, 3 sc in same sp, * 3 sc in next sp, repeat from * around, join with sl st in first sc.

Rnd 7: Ch 1, sc in same sc as join, *ch 3, skip next sc, sc in next sc, ch 6, sl st in 3rd ch from hook, ch 3, skip next 3 sc, sc in next sc, repeat from * around, join with sl st in first sc. Fasten off and weave in ends.

Dot and swirl some glue on the front of the card and press the doily to the card, pulling with your fingers to flatten it out completely.

Monday, 24 August 2015

Short Rows for Lace

Short Rows for 8 row Lace

Posted by rachelerin on May 7, 2012 in All Tutorials

by Rachel Erin Designer


I made this tutorial specifically for the Tramonto lace shawl pattern, and it is intended to be accompanied by them.

If you are looking to do short rows in a different lace pattern, the basic principles in this tutorial will help you get a sense of one way to do it.


READ ORIGINAL POST HERE

Part 1: Double Wrapping Column Stitch 2

The stitch pattern used has 8 rows per repeat, and the last two stitches are a column of knit stitches that is worked in a Right Twist every 4 rows.
To fit a full repeat of lace into one Short Row section, each column stitch (labelled below) is double wrapped.

Here is a photo of the shawl


Link to the PHOTO HERE

Get the PATTERN HERE


Step 1: Work Row 1 of Sun Ray pattern up to column stitch 2.

Step 2: Bring yarn to front (shown below).


Step 3: Slip column stitch 2 to the right needle. (2 photos below)


Step 4: Bring yarn to back.


Step 5: Slip column stitch 2 back to left needle.


Step 6: Turn work and purl to end (Row 2).


Repeat Steps 1-6 once more (Rows 3 and 4 of the Sun Ray pattern). Work should look like the photo below right before you turn to purl back the second time.


Rows 5-8 of the Sun Ray pattern are used to double wrap column stitch 1; those steps are detailed in Part 2.

Part 2: Double Wrapping Column Stitch 1.


This is a little trickier because of an adjacent yarn over.

Step 1: Work Row 5 of Sun Ray pattern up to column stitch 1, including preceding yarn over.


Step 2: Bring the yarn to the front.


Step 3: Slip the 1st column stitch to the right needle.


Step 4: Bring the yarn to the back.


Step 5: Slip the 1st column stitch back to the left needle.


Step 6: Turn work and purl to end (Row 6).


Repeat Steps 1-6 to double wrap the stitch (Rows 7 and 8 of Sun Ray pattern). Finished stitch looks like this from the Right Side (photo below).


So, now you are back on Row 1 again, and your next step will be to work Row 1 of the Sun Ray pattern across the entire row.
When you get to the double wrapped stitches, you will pick up the wraps and continue on your way without doing a RT.
The steps for picking up and knitting the wraps are detailed in Parts 3 & 4.


Part 3: Picking and knitting the wraps on column stitch 1.


In this part, you pick up the wraps, rearrange them to get the wraps behind the column stitch, and then knit the column stitch together with the two wraps.

Step 1: Work Row 1 of Sun Ray stitch up to column stitch 1.


Step 2: Slip column stitch 1 to right needle; identify wraps.


Step 3: Pick up wraps with left needle.


Step 4: Slip column stitch 1 back to left needle.


Step 5: Pick up wraps with right needle, and lift them over column stitch 1.


Step 6: Slip the wraps back onto the left needle, behind column stitch 1.


Step 7: Knit together the column stitch and the two wraps.


Part 3 Complete! Continue directly on to Part 4. DO NOT turn and purl back – the wraps on both column stitches are picked up in the same row.


Part 4: Pick Up Wraps, Rearrange, and Knit Together with Column Stitch 2.


Step 1: Congratulate yourself on having done it once already.

Step 2: Slip column stitch 2 to the right needle, and identify the two wraps on column stitch 2.


Step 3: Pick up the two wraps with the left needle.


Step 4: Slip column stitch 2 back to the left needle.


Step 5: Pick up the wraps with the right needle, and lift them over column stitch 2.


Step 6: Slip the wraps back to the left needle.


Step 7: Knit column stitch 2 together with the two wraps.


Part 4 Complete!

Finish working the row in pattern.

You have now worked eight short rows in pattern, adding curve and ruffle to your shawl.


Thursday, 20 August 2015

IRISH CROCHET LACE

LACIS MUSEUM OF LACE AND TEXTILES
2982 ADELINE STREET, BERKELEY CA 94703

Read the COMPLETE ARTICLE HERE

IRISH CROCHET LACE

The mid 1800’s found Ireland in the midst of a devastating famine. A potato blight had obliterated the agricultural mainstay of the nation. The country was in desperate need of a lucrative commodity to lift it out of its declining state.

Lace making was a profitable business, but the traditional methods were too slow to afford the quick relief that the country needed.

In an effort to copy the treasured and exquisite forms found in the valued Venetian Needle lace and the more delicate filigree of Rosaline lace, emerged a distinctive style of crochet that proved to be both quick and profitable.

It soon became known as “Pt. d’Irlande’ in the countries who sought its beauty. It is a style that has earned the right to stand alone, a thing of beauty, to be admired, coveted and collected by the best of collectors. Its delicate filigree and bold relief still speak of dedication, skill and the desire for a better life.

It is generally accepted that it was Mademoiselle Riego de la Blanchardiere who invented the now famous style. She published the first book of Irish Crochet patterns in 1846. It was used and referred to by both the schools of crochet that sprang up and by the ever growing Irish cottage industry.
The distinctive feature of Irish Crochet is its separate motifs joined by either filigree mesh or crocheted bars. Stylized motifs of flowers, shamrocks, and grapevines are arrayed in splendor. It is an artistic mode of crochet that lends itself well to the creative mind. A cord padding is often incorporated into the motif and by carefully adjusting the tightness and the amount of stitches, the stems, leaves and flowers can be artistically manipulated to add ‘life’ to the objects. The pattern is meant merely as a structural skeleton, much is left to the imagination of the worker. Two people, making the same motif, can turn out vastly different products. It is the creative spirit and thoughtful eye that enabled someone to manipulate the pattern to instill vitality into the growing work.
Crochet itself was well adapted to the rigorous life of the peasant people. Cotton thread was cheep and easily laundered.

The technique required only the crudest of handmade tools: the crochet hook. The labor could be done either by the light of day, or in the dim glow of a peat fire lamp helped by a glass globe of water to reflect back what little light it shed.

The lace often became dirty in the harsh conditions of poverty and had to be washed before it was sold.

Particularly fastidious workers would wrap the work in progress and put it under their bed at night. This practice became known as “bedding the work”.

The labor soon became a family occupation. Young and old, women as well as men turned to this new industry to provide life’s sustenance. Within Ireland itself, the lace became known as “relief lace”. A division of labor sprang up.
The technique adapted well to all levels of ability.
Everyone in the family could contribute to the finished piece. One person might make the same motif over and over.
The more difficult patterns were left to the nimblest of hands, while those less agile and creative could work the simpler leaves and stems.
The motifs were brought by foot to a lace-making center in the town. There they were arranged in a studied manner and crocheted together to form everything from collars and cuffs to bodices, dresses and coats.

Clones lace is an Irish Crochet lace, named after the town where it was marketed, developing its own character over nearly 150 years. Cassandra Hand, wife of the local Church of Ireland minister introduced it as a famine relief scheme to this small drumlin region of west Monaghan and south-east Fermanagh in 1847. Within a short period, nearly every family in the area was involved in the production of crochet lace, supplying markets in Dublin, London, Paris, Rome and New York.

Clones soon became the most important center of crochet lace-making in the north of Ireland, while Cork was the leading center in the south.

Irish Crochet lace originally derived from specimens of Venetian rose point, first brought to Ireland in the 1830’s by Ursuline nuns in Blackrock, Cork from France.
Indeed, the crochet lace that developed in Cork is very distinctive.
It comprises very large motifs, joined by thick bars, which are made up of double crochets
stitched over foundation chains.
There are varying accounts of between 12,000 and 20,000 girls being employed in its production from 1847.
Mrs. Meredith was the patron of the Adelaide school for crochet in Cork, which became a depot
where lace was received and sold.

Most families had their own secret and closely guarded motifs. 
The family nickname often reflected the motif with which the family was associated, such as the ‘Lily Quigleys’ or the ‘Rose McMahons’. 
When neighbors entered a house unexpectedly, the lace was hidden from view. Their special motif was the basis of a family’s income.
Many motifs have gone to the grave due to the secrecy, although pattern makers examined finished pieces in the USA and England and transcribed them in Irish Crochet publications. 

Crochet workers delighted in creating new filling stitches, embellishments and motifs, as these would bring them a better income.

Wednesday, 19 August 2015

What is….broomstick lace

What is….broomstick lace

by simplycrochet September 27, 2013 8:43 am

Read ORIGINAL POST HERE


Also called jiffy lace (because it’s so quick to work) or peacock eye crochet, this form of pretty, open crochet is worked with a large knitting needle (or a broomstick if you’re feeling very daring!) and a standard crochet hook.

Broomstick lace dates back to the 19th century and gets its name from being worked with a broom handle, which was the most conveniently available big needle for ordinary people. This technique, full of twists and loops, is actually much simpler than it looks. A combination of large loops are worked over the big needle and gathered together in groups of 4-6 stitches to make lacy patterns that have a gentle twist. You can use double, half treble, treble – or indeed any other type of crochet stitch – to create quite different lacy effects. The larger the needle, the bigger the loops you’ll create. You can even change sizes of ‘big’ needle from row to row to create your own individual designs. Both the crochet rows and the loop rows are worked from the same side, so you don’t ever need to turn your work.

The open construction means that broomstick crochet is a fast stitch to work, and a magnificent way to showcase special yarns with one-off textures, twists, slubs or lustres. If you use a fine yarn, you’ll get a light, lacy fabric, whereas heavier yarns will create a thicker and cosier effect. Whichever you choose, it’s undoubtedly an impressive-looking crochet stitch, ideal for making a scarf, wrap or lap blanket.


Tuesday, 11 August 2015

Leaf Lace Alpaca Hood

Leaf Lace Alpaca Hood

© 1998, Judy Gibson


This snug alpaca hood can be a quick gift, or simply a way to try out a luxury yarn. It took me about two days to knit the first one. It is a seamless 30" tube, knitted upward from an edging of a simple narrow lace scallop pattern, incorporating a few inches of a multicolored mohair blend to highlight the face, and finished with an I-cord border.


Materials:


2 50g (115 yd) skeins Classic Elite "Inca" 100% alpaca (I used sage green for my first hood, a dark teal -- shown here -- for the second)

1 50g (88 yd) skein Brown Sheep "Handpaint Originals" 70% mohair, 30% wool (I used color HP-10, Mineral Green)
Circular needle, size 9 (US), 18 to 24"

Note: I used all of the alpaca and more than half of the mohair. The photo shows the second hood I made, where I didn't have enough of the mohair for the full width of the contrast band. You could, of course, substitute other yarns.

Gauge swatch:

Cast on 17 stitches, and work two repeats of the openwork leaf pattern (it's a multiple of 8 + 1). It should be 5" wide; if it's wider, you risk running out of the alpaca and should maybe plan on using all your mohair, or going down a needle size; if it's narrower, it might be too tight to wear, and you should use a bigger needle. (I get 4 sts/in in stockinette with this yarn and needle size.)

General instructions:

Cast on 5 stitches in the alpaca, and work 32 repeats of Barbara Abbey's "Very Narrow Edging." Bind off the 5 stitches along with the 5 cast-on stitches, which will join the edging into a circle. Turn it so that the rough side of the seam is to the inside.

Each repeat of the edging has three loops along the inner edge (formed by the "yo, p2tog" at the beginning of the odd numbered rows); pick up a stitch through each of these 96 loops. Knit the last pick-up stitch together with last of the bindoff stitches, if necessary, to get the correct number. This is the first round of the main pattern, which is Barbara Walker's 12-row Openwork Leaf Pattern. A full repetition of the pattern consists of 8 repeats per round, and 12 rounds.

Work 4 repetitions of the pattern (to round 47, actually), and change to the mohair yarn. Work 2 repetitions in mohair (to round 71, actually), change back to the alpaca, and work one repetition. I have changed yarns on round 11 of the repeat, since the color change is less conspicuous at the narrow ends of the diamond patterns.

Bind off using a 3-stitch I-cord bindoff, thus: cast on 3 stitches by backward loops on the right needle. Slide these three stitches onto the left needle. *Knit 2, knit 2 together, slide 3 stitches to the left needle.* Repeat this until the entire edge is bound off, then using the tail of the yarn, graft the 3 stitches to the 3 cast-on stitches, and fasten off.


Very Narrow Edging
Cast on 5 sts and work back-and-forth. ("kpk into yo" means make 3 stitches by knit, purl, knit into the loop formed by the yo of the previous row)

Row 1: yo, p2tog, k1, yo, k2
Row 2: k2, kpk into yo, k1, yo, p2tog
Row 3: yo, p2tog, k6
Row 4: k6, yo, p2tog
Row 5: yo, p2tog, k6
Row 6: bind off 3, k2, yo, p2tog
This gives one scallop. Repeat 31 more times.

Openwork Leaf Pattern

(Chart is read bottom up, right to left)
Work on circular needle; the extra edge stitch shown in parentheses is needed
when working gauge swatch back-and-forth. At the end of rounds 8, 10, and 12,
include the first stitch of the next round in the double decrease.

A = double decrease, worked thus: slip 1 as if to knit, knit 2 together,
pass the slipped stitch over (I used "A" because it resembles the usual
three-lines-coming-to-a-point symbol, not available in a computer font)
O = yarn over
| = knit (this symbol merges into a vertical line in some typefaces)
^ = knit 2 together

A O | | | | | O (^) Rnd 12 (end ^ in swatch)
A | O | | | O | (^) Rnd 10 (end ^ in swatch)
A | | O | O | | (^) Rnd 8 (end ^ in swatch)
| | | O A O | | (|) Rnd 6
| | O | A | O | (|) Rnd 4
| O | | A | | O (|) Rnd 2
Rnd 1 and all odd numbered rounds: knit (purl in swatch)
Thoughts on possible modifications:

The gauge I used gives a 30" diameter tube about 15 inches long. This is fairly short and snug. A larger diameter would be fine, I'm sure. If much longer, it would bunch too much around the neck, and some way would needed to make it flare for the shoulders.

An additional 8 scallops of the edge pattern will allow 3 more repeats of the leaf pattern, a 25% increase in circumference. This sounds too big to me, unless the gauge is smaller. (My version uses 32 scallops and 12 repeats of the leaf pattern.)

Sources of pattern stitches:

Barbara Abbey, Knitting Lace. Schoolhouse Press. Pittsville, WI, 1993. (Very Narrow Edging, pattern #2, page 44.)
Barbara G. Walker, The Craft of Lace Knitting. Charles Scribner's Sons, New York, 1971. (Openwork Leaf Pattern, page 34.)

Permission is granted for noncommercial use of this pattern, provided that my name and email address (jgibson@cts.com) remain with it. You may not charge money for the pattern -- including reproduction costs or requiring a purchase -- or place a copy on any internet site without my explicit permission.