 |
| Copyright: studio-miranda |
Showing posts with label Cast on. Show all posts
Showing posts with label Cast on. Show all posts
Saturday, 28 November 2015
Sideways Edge Cast-On, a knitting unvention! plus, Swerve!
by Lee Meredith
READ ORIGINAL POST HERE
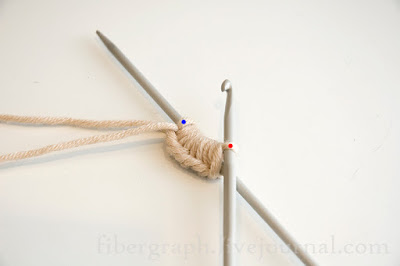
So, start out by casting on the number of stitches in your edge – you may want to use a provisional cast-on so you can graft or 3-needle bind-off later if you’ll be working in the round. In this example, my edge number is 6 stitches, and after casting on I knit one row, then purled one row to get started (these starting rows can change depending on pattern specifics), followed by my first increase row, so the beginning goes:
Cast-on 6 stitches.
Knit 1 row.
Purl 1 row.
Kfb, place marker, k to end.
And now it looks like:
READ ORIGINAL POST HERE
So, start out by casting on the number of stitches in your edge – you may want to use a provisional cast-on so you can graft or 3-needle bind-off later if you’ll be working in the round. In this example, my edge number is 6 stitches, and after casting on I knit one row, then purled one row to get started (these starting rows can change depending on pattern specifics), followed by my first increase row, so the beginning goes:
Cast-on 6 stitches.
Knit 1 row.
Purl 1 row.
Kfb, place marker, k to end.
And now it looks like:
 |
| Copyright: Lee Meredith |
Saturday, 31 October 2015


Monday, 17 August 2015
winding (provisional) cast on
winding (provisional) cast on
Read the ORIGINAL POST HERE
You need: 2 circular needles & yarn
Needle 1 = needle you will knit with
Needle 2 = holder for the live sts (use a smaller needle size for this — you want snug loops)

1. Tie a slip-knot and place on Needle 2
Hold both needles together, Needle 1 on top

2. Wind yarn around both needles (from below, up and over, around back)

3. Continue to wind

4. When you have the desired number of stitches, pinch the yarn against the needles and turn them around to knit

4.1 …like this

5. Holding yarn in place, pull Needle 2 through to dangle freely

5.1 (Needle 2 pulled through)

6. Getting ready to knit

7. Place yarn over index finger (around/catching Needle 2 cable)

8. Knit

9. Continue to knit

10. Knit final stitch and leave slip-knot in place on Needle 2 (remove this knot before knitting the live stitches on this cable)

Completed first row
(at this point the Winding Cast On equals Judy’s Magic cast-on – so if you are using that or a similar provisional cast-on for an Åsa Tricosa pattern, you should skip the first knitted row)

First row seen from WS (wrong side)

Three rows completed
In this example, the live sts are left on Needle 2 to be worked later
The work grows upwards in one direction.
This can be useful for knitting each half of a scarf or shawl from the centre and outwards knitting each half of collar from centre back (as in Tric and Koronki)
saving the hem decision on a bottom-up sweater for last
identical cast offs and edges for a scarf
knitting the first leaf of the Semele shawl
starting the Galathea shawl
The Winding Cast On is equally useful for starting a toe-up sock or top-down mitten.
In that case you will knit the live stitches on Needle 2 immediately after knitting back the first row and in this way work in the round – that is, in “two directions”.
(Knit the stitchess on Needle 1, then flip the work over to knit the stitches on Needle 2 = 1 round)

This will require either double point needles or magic looping or two circulars.
Sunday, 16 August 2015
Garter Tab Cast On
Garter Tab Cast On
Link to the ARTICLE HERE
The Garter Tab Cast On is how I start all of my top down shawls; I love this cast on! I didn't love it at first though. In fact, I didn't like it and stayed away from it. Why? Because it seemed hard and confusing, and I really didn't understand what in the world it was for.
This way of thinking is of course, silly. Nothing is hard once you learn to do it. In order to learn, you must do. And it's just yarn - if you don't get it the first time (and you probably won't), try again and again until you get it.
One day I tried it and discovered it was sooo easy and I love it! There really isn't anything hard about it. You cast on a few stitches, pick up and knit a few more stitches, and there you have a garter tab cast on.
The main reason I wanted to master the garter tab cast on is because I really wanted to knit a top down shawl. I couldn't quite wrap my mind around how you could knit a triangle shawl starting from the top, instead of from the bottom point. I wanted to know! The only way I knew to start a top down shawl was with the garter tab cast on. I know now it isn't necessary to use a garter tab, but it is my preferred method. And by the way, top down shawls aren't hard to knit either. They are just as easy to knit as a bottom up triangle shawl.
Before we begin, I will say that this is only one way to do a garter tab cast on. Some knitters prefer to do a provisional cast on, and then when ready to pick up along the cast on edge, remove the waste yarn and pick up the live stitches. Too much muss, fuss, and fiddle for me. This tab is such a small part of the knitting, nobody is even going to notice. If you'd like to see the provisional cast on method, just do a search and you will get plenty of results.
For the garter tab cast on, I normally start with four stitches, because I have this thing about even numbers, but often you will see patterns call for you to start with three stitches and knit six rows. In addition to my 'thing' for even numbers, I think four is just easier to work with than three. So for our purposes here, we will use four.
Cast on four stitches.
Knit eight rows.
After last row, do not turn work over. Instead, keeping the same side of the work facing you, turn the tab 90 degrees clockwise so that the left side of the tab is now facing up - you will pick up and knit four stitches along the side.
Now, turn the tab again so that the cast on edge is facing up; you will pick up and knit four more stitches along the cast on edge.
You should have a total of twelve stitches and are ready to begin.
This is just an example; always cast on/knit/pick up the number of stitches your pattern directs. Even if you are working with a different number, the method is the same.
Once you have the required number of stitches on your needles, continue on with your pattern. I usually knit a plain row before beginning the increases - that is just how I do it. You can do whatever you feel works best for you.
Since this technique is/can be confusing in writing, of course I have a video to show you how it is done.
Here you go, and Happy Knitting!
Thursday, 13 August 2015


Tuesday, 11 August 2015
Provisional Cast On: a Two-Step Method
Provisional Cast On: a Two-Step Method
A provisional cast-on keeps cast-on stitches “live” so that they can be knit later. It’s a very useful technique when you’re not sure what kind of edging you’ll want or how long to make something. With a provisional cast-on, you can make these decisions at the end of a project, allowing you to respond to the actual garment. I made this tutorial to go with my 70’s Ski Hat Project Journal, the provisional cast-on is used to make a cashmere lining for the hat.
There are a few ways to make a provisional cast-on. This is my favorite…
With some smooth waste yarn and a crochet hook, chain a few more stitches than you will be casting on. Cut the tail and pull it through the last stitch.
Examining the chain, the front side is made up of V’s.

The back of the chain has bumps in it.

Insert a knitting needle into each bump on the back of the chain, and using the yarn you are knitting with, pick up however many stitches you’re casting on.


Then just knit! When you’re ready to use the cast on stitches, thread a knitting needle through the right side of each stitch. It’s like weaving – over a strand, under a strand…

Then remove the crocheted chain by untying the end and gently unraveling the whole chain.

You’re ready to knit in the other direction!
Provisional Cast On: a One-Step Method
Provisional Cast On: a One-Step Method
A Provisional Cast On keeps cast-on stitches “live” so that they can be knit later.
It’s a very useful technique when you’re not sure what kind of edging you’ll want or how long to make something.
A Provisional Cast On allows you to make these decisions when you can to respond to the actual finished piece.
Sometimes a Provisional Cast On is also used to create underarm stitches in top-down sweaters.
There are, of course, tons of other fabulous uses of this cast on… You’ll see!
This video demonstrates a one-set method, which casts stitches directly onto the needle, rather than first crocheting a chain and then picking stitches up from that chain. For that method, check out our Provisional Cast On Tutorial: A Two-Step Method.
Cable Cast On
Cable Cast On
A Cable Cast On is a good way to cast on stitches in the middle of your knitting. Often a pattern asks you to be knitting along and then says, cast on some number of stitches. I almost always use a Cable Cast On in that situation. This example comes from our Baby Shorts.
First, turn the work so the wrong side (or inside) is facing you.
Insert the right needle between the first and second stitch of the left needle.

Knit a stitch onto the right needle, just like you normally would., except do not remove anything from the left needle.

Now there’s a stitch on the right needle.

Without twisting it, place that stitch onto the left needle.

It looks like this:

Repeat the steps for however many stitches you’re casting on. Insert the right needle between the first and second stitches of the left needle.
(The first of those stitches is the one you just cast on.)

Here is what 10 stitches cast on look like (after turning the work so the right side is facing):

A couple of tips:
Cast on loosely. It gets really difficult to deal with a Cable Cast On if the stitches are too tight.
Also, make sure you keep track of how many stitches you have cast on. It can be kind of tricky to determine which is the first cast on stitch!
Follow up on using the Turkish Cast-On
Follow up on using the Turkish Cast-On
Link to the first POST in this blog HERE
I've gotten a lot of feedback on this technique and how I used it for the socks and the little pouch.
For the socks: I cast on 12 stitches (6 wraps) and worked the first two rows per the instructions. I then switched to 4 DPNs - 3 stitches per needle - as this is my preferred method for knitting socks (those that use magic loop or 2 circs can easily adapt this for your preferred method) I wanted to use a "star toe" so I increased 4 stitches EVERY row as follows: At the beginning of each needle K1, M1, knit to end. I increased in this manner until I had a total of 24 stitches and then increased EVERY OTHER ROW until I had 64 stitches (for a woman's medium and an 8 inch circumference). At this point you can add whatever pattern you choose - keep in mind that the pattern you choose, if you are designing your own sock, may decrease (lace) or increase (cables) the number of stitches you need.
If you prefer the standard wedge toe: Cast on 12 stitches (6 wraps) and work the first 2 rows as instructed. Distribute stitches on 4 DPNs and increase every row as follows: K1, M1, knit to end of needle 1. Knit across needle 2 to last 2 stitches, M1, K1. K1, M1, knit to end of needle 3. Knit across needle 4 to last 2 stitches, M1, K1. Continue to increase in this manner EVERY row until you have 24 total stitches then increase EVERY OTHER ROW until you have 64 stitches. For magic loop or 2 circs follow the above with 6 stitches per needle to start.

For the little pouch: I cast on 40 stitches using the Turkish Cast-On (20 wraps) I worked the first 2 rows as instructed and 2 additional rows. I then increased 4 stitches: On the next row K1, M1, knit to last 2 stitches, M1, K1. Turn. K1, M1, knit to last 2 stitches, M1, K1. I then worked even for 3 inches. Next row K2, yo, k2 tog repeat to end. Turn. Repeat eyelet row. Work 2 more rows even then bind off. Make a cord of your choice ( crochet, lucet, I-cord, twisted) and thread thru eyelets. No SEAMS! Voila!

Subscribe to:
Posts (Atom)