MAGAZINE

This "magazine" pretends to be a compilation of the best articles in knitting and crochet.
It is a virtual "note book" for the avid knitter and crochetter ... always needing to learn more.
Please read my HOME PAGE


Sunday, 11 October 2015

Ruffled Hexagon Baby Jacket


READ ORIGINAL POST HERE


Hexagon Baby Jacket with Ruffles 
Elisa’s Version – 9 to 12 month size
Copyright February 2009


My version of this cute jacket was inspired by Bev's Hexagon Baby Jacket; which, in turn, was inspired by one posted on Tina's blog. There's even a 'filled-in' version here.
In addition to increasing the size, I added a stand-up collar, and put ruffles at the cuffs and hem for a more feminine look. The jacket's dimensions are easily customized by changing yarn and/or hook size. For example, the newborn size uses DK weight yarn and an "F" hook; Bev's 3-6 month size uses a soft 4-ply worsted yarn and a "G" hook; my version uses worsted weight yarn with an "I" hook. Enjoy!
Materials for 9-12 Month Size Jacket:
  • 2 colors worsted weight yarn (such as Lion Brand Wool-Ease or Plymouth Encore); approx 200 yd each.
  • Size “I” hook
Jacket Measurements:
  • Underarm to cuff = 7”
  • Shoulder to bottom of jacket = 12”
  • Across jacket under arm front = 10 ½"

Start Hexagon (make 2): Ch 4, join to make a ring.

Rnd 1:

  • Ch 3, (counts as first dc), 2 dc inside ring.
  • *Ch 2, 3 dc in ring.
  • Repeat from * 5 times. (for total of 6 groups of 3dc.)
  • Ch 2, join with slip stitch to 3rd ch of beginning ch3.
Rnd 2:
  • Slip stitch in next stitch and into ch 2 space.
  • Ch 3, 2 dc in same space. Ch 2, 3 dc in same space.
  • *Ch 1, (3 dc, ch 2, 3 dc) in next ch 2 space. Repeat from * 5 times. (for total of 6 groups of 3dc, ch2, 3dc)
  • Ch 1, join with slip stitch to 3rd ch of beginning ch3.
Rnd 3:
  • Slip stitch in next stitch and into ch 2 space.
  • Ch 3, 2 dc in same space.Ch 2, 3 dc in same space.
  • *Ch 1, 3 dc in next ch 1 space.
  • Ch 1, (3 dc, ch 2, 3 dc) in next corner.
  • Repeat from * 5 times around.
  • Ch 2, join with slip stitch to 3rd ch of beginning ch3.
Rnd 4: Change to contrast color for stripe
  • Slip stitch in next stitch and into ch 2 space.
  • Ch 3, 2 dc in same space.Ch 2, 3 dc in same space.
  • *Ch 1, 3 dc in next ch 1 space.
  • Ch 1 (3 dc, ch 2, 3 dc) in next corner space.
  • Repeat from * 4 more times.
  • Ch 2, join with slip stitch to 3rd ch of beginning ch3.
Rnd 5:
  • With main color, repeat pattern established in Rnd 4.(Photo shows second color change on Rnd 8 & 9, with return to main color on Rnd 10)
Rnd 6-10: Change back to main color
  • Repeat pattern established in Rnd 4. (I added a second color change on Rnds 8 & 9, returning to the main color on Rnd 10)
Fasten off. Weave in ends.


Sew Hexagons Together:

  • Fold hexagons to form 2 sides of the jacket (see photo); fasten top seam with stitch markers to hold in place.
  • Holding back pieces with right sides together and working through outside loops of stitches only, sew two halves together at back seam. (see photo)

  • Working in outside loops only, stitch shoulder seams across top of jacket from cuff to third 3dc-group from front neck edge. Repeat for second shoulder.
How interior seam should look
How exterior seam should look

Cuffs:
Rnd 1:

  • Using contrast yarn, join with slip stitch anywhere on cuff edge.
  • Ch1, sc in same stitch;
  • sc in each stitch and chain-1 space around.
  • Join with slip stitch to beginning slip stitch.
Rnd 2:

  • Ch1, sc in same stitch.
  • Sc2tog around. (See Stitch Guide)
  • Join with slip stitch in first sc.
Rnd 3:

  • Ch2, hdc in same stitch and each stitch around.
Rnd 4:

  • Repeat Rnd 3.
Rnd 5

  • Working in the back loop only for this entire row, ch 4,
  • (dc, ch 1, dc, ch 1) in same stitch as join.
  • *(Dc, ch 1, dc, ch 1, dc, ch 1) in next stitch.
  • Repeat from * around.
  • Join with a slip stitch in 3rd chain of beginning ch 4. Fasten off.
Repeat for second cuff.

Sweater Edging:
  • Join contrast color with slip stitch in center back of jacket.
  • Sc in each stitch and space along bottom edge,
  • *(2 sc, ch 2, 2 sc) at corner,sc in each stitch and space along front edge*,
  • (2 sc, ch 2, 2 sc) at corner,
  • sc in each stitch only (not in space between 3dc clusters) around neck
  • repeat from * to *.
  • Slip stitch in first sc. Fasten off.
Bottom Edge of Jacket:
Rnd 1:
  • With right side facing you and bottom of sweater facing up, join yarn in right corner on bottom of sweater.
  • Ch 2, hdc in same stitch and each stitch across. Ch 2, turn.
Rnd 2:
  • Repeat Rnd 1.
Rnd 3:
  • Working in the back loop only, ch 4,
  • (dc, ch 1, dc, ch 1) in same stitch as join.
  • *(Dc, ch 1, dc, ch 1, dc, ch 1) in next stitch.
  • Repeat from * around.
  • Join with a slip stitch in 3rd chain of beginning ch 4. Fasten off.

Button Band and Neck:
Rnd 1:
  • With wrong side facing, join yarn in bottom corner of left front.
  • Ch 2, hdc in same stitch and each stitch up right front – with (hdc, ch1, hdc) in center corner stitch - around neck, to right front corner.
  • Work corner, then hdc in next 2 stitches, ch 3, skip 3 sc*, repeat from * to * twice more (total of 3 buttonholes),
  • hdc to end of row (do not hdc in side of ruffle).
  • Ch 1, turn.
Rnd 2:
  • Sc in each stitch around, working 3 sc in each ch3 space and (sc, ch1, sc) in each corner.
Fasten off. Weave in ends. Sew on buttons. Enjoy!


Hexagon Sweater

READ ORIGINAL POST HERE


Sue's Hexagon Baby Sweater

Materials: sport weight yarn
(I used Lion Brand Baby Soft) and an F hook


Ch 6, join yarn with a sl st to form a ring.


Round 1: Ch 3 (count as 1st dc), 2 dc in ring, *ch 2, 3 dc in ring, repeat from * 4 times, ch 1, hdc into top of beg ch 3 (6 sets of 3 dc).


Round 2: ch 3, dc in same space, *dc in each dc, 2 dc, ch 2, 2 dc in ch 2 space, repeat from * 4 times, dc in each dc, 2dc in ch 2 sp, ch 1, hdc in top of ch 3.


Rounds 3 - 12: Repeat round 2

At the end of round 2 fasten off. Make a second hexagon leaving abut a yard of yarn for use in stitching.

Sew the 2 hexagons together along one side and then fold the "wrinkled bathmat" to us an Elizabeth Zimmermann phrase into a sweater. The seam you just sewed is the center back. The tops of the sleeves will be open. Refer to the link of the original for pictures.

Sew the top of sleeve seams from the cuff edge to 3 1/2 inches from each front edge.

Collar
Join yarn with a sl st at the front neck edge, ch 3, dc in same st, dc in each st to shoulder seam, *dc dec over next 2 sts, dc in next 5 sts, rep from * to next shoulder seam, dc in each st to neck edge, 2 dc in top of turning ch.

Row 2: Turn, ch 3, dc in same st, dc in each st across, 2 dc in last st.

Rows 3 - 5: Repeat row 2

Fasten off and weave in ends.

Cuffs
Join yarn with sl st at the underarm edge (directly below the shoulder when the sleeve is folded flat). Ch 3, dc in next 4 dc, * dc dec over next 2 sts, dc in next 5 sts, repeat around, join with a sl st in top of beg ch 3.

Round 2: Repeat round 1

Round 3: Ch 1, sc in each st around, join with sl st in beg ch, fasten off, weave in ends.

Repeat for other sleeve.

Edging
join yarn with sl st at neck edge, just below collar. Ch 1, sc in same st, *ch 3, sk 1 st, sc in next st (button loop made), sc in next 10 sts, repeat from * 3 times, sc in last dc, 2 sc, ch 2, 2 dc in corner ch loop, dc in each st all the way around the bottom edge to other front corner, 5 dc in corner ch loop, dc in each st up front (for button band) to neck edge, ch 1, turn, sc in each st down front and across back ending at bottom front corner. Fasten off and weave in ends.

Sew buttons on button band opposite button loops.


Hexagon Granny Baby Jacket

Copyright 2008 Bev's Country Cottage 


ORIGINAL POST HERE


Ch 4, join to make a ring.
Rnd 1: Ch 3, (counts as 1st DC), 2 dc inside ring. *Ch 2, 3 dc in ring. Rep from * 4 more times. Ch 2. Join w/ sl st to 3rd ch of beg ch3. (6 groups of 3 dcs. you will be making a hexagon so go round and round...)Rnd 2: Sl st to ch 2 space. Ch 3, 2 dc in same space. Ch 2, 3 dc in same space. *Ch 1, (3 dc, ch 2, 3 dc) in next ch 2 space. Rep from * 4 more times. Ch 1, join w/ sl st to 3rd ch of beg ch 3.
( You now have 6 shells, 6 ch 2 spaces, 6 ch 1 spaces)
Rnd 3: Sl st to ch 2 space. Ch 3, 2 dc in same space. Ch 2, 3 dc in same space.  *Ch 1, 3 dc in next ch 1 space. Ch 1, (3 dc, ch 2, 3 dc) in next corner.
Rep from * 4 more times around. Ch 2, join with sl st to top of beginning ch 3.

Change colors for a stripe - Rnd 4: Sl st to ch 2 space. (now form the corner) Ch 3, 2 dc in same space, ch
 2, 3 dc in same space.  * (Ch 1, 3 dc in next ch 1 space) twice.  Ch 1 (3 dc, ch 2, 3 dc) in next corner space. Rep from * 4 more times. Ch 2, join w/ sl st to top of the ch 3.

Rnd 5: Repeat pattern established in round 4 with a ch 1 between sets of 3dc except at corners where you ch 2 between sets of 3 dc.
Rnd 6-10 :  Switch back to main color and repeat pattern established in round 4.  End off.

Make a 2nd one so you have 2 halves of the jacket.

Fold Hexagon in half to form the 2 sides of the jacket.

Stitch the 2 halves together at the back seam.     


Stitch across the top of the jacket at the shoulder seams in the same manner to the 3rd "3dc" from the front neck edge. Repeat across the shoulder of other side.


CUFFS:

Rnd 1: Join contrast yarn on cuff 'bottom', Ch 2 (counts as a HDC), HDC in every other stitch around, and in every ch 1 space.
Rnd 2:  Make HDC front post stitch, then make HDC back post, repeat around cuff. Join in top of ch 2.  Ch 2.
Rnd 3: Repeat this same round once.  You will be making front posts into front posts, and back posts into back posts.
Chain 1 and turn.
Now, *Sc in next stitch, skip 1 st, sc in next, repeat from * around.  End off, weave in 3" yarn tail.
Repeat on opposite cuff.

  Sweater edgingJoin contrast color in back center of jacket - sc in each st around entire sweater, 1 sc in each stitch including the ch 1 spaces.  At corners (2 sc, ch 2, 2 sc) - sc to end.  End off

Bottom edge of JacketJoin yarn in a corner of bottom of sweater, ch 3,  - DC around to other side.  Ch 2, turn.
Alternate Front post DC, back post DC, across. Ch 3 at end of row, turn and repeat across one more row.
Ch 1 and start sc up the front in each stitch to the top of jacket front.

NECK:  Ch 3, now 1 DC in each st across to other side of neck. Ch 3 and turn. Front post DC, back post DC alternate across neck, ch 3, turn and repeat previous row. 
You are now at the right side of the jahexagon sweatercket as it faces you.
Sc down front right hand side making four button loops evenly spaced. The first button loop will be made approx. 18 scs in where the collar if folded down.
(See photo)
To make button loop... sc, ch 4, skip 1 st, sc in next.
*Sc in next 8 scs, ch 4, skip 1 st, sc in next.  Repeat from *  to bottom of jacket.

End off. Weave in all ends.


Great granny cardi

READ ORIGINAL POST HERE


Granny squares have fascinated and delighted crocheters for as long as I can remember.
During the 70's craft magazines were filled with granny square projects.
There was no shortage of ideas, either in fashion or decor.
At the time, the most popular yarn weight used was worsted and for the most part, acrylics.
What appealed to me about this design was the simplicity of the pattern.
You can virtually adapt this design to suit your every whim.
Personally, I like to keep it simple and let the yarn do the work.
This is where marls, tweed and multicoloured yarns are so good.
Whatever you pick, this design is fast, fun and fantastic.

Read further for more design inspiration, a free pattern and a video tutorial.


Colour is one of those topics that is intensely personal.

http://www.passionforum.ru/posts/27397-zhaket-iz-dvuh-shestiugolnikov.html


http://www.passionforum.ru/posts/27397-zhaket-iz-dvuh-shestiugolnikov.html


YOUTUBE VIDEO HERE


YOUTUBE VIDEO HERE


Hexagon Baby Sweater

READ ORIGINAL POST HERE


This isn't really a row by row pattern.

You are basically making two hexagons and sewing them together for the back and sleeves...

Here's one hexagon. See how it is all ruffly?

It's supposed to look like that.


It will fold up into this:


You will make two of them and sew the back seam.


"Hexagon" (Make Two):

Ch 6, join to make a ring.

Round 1: Ch 3. 2 dc in ring. *Ch 2, 3 dc in ring. Rep from * 4 more times. Ch 2. Join w/ sl st to 3rd ch of beg ch3. (6 groups of 3 dcs.)

Rnd 2: Sl st to ch 2 space. Ch 3, 2 dc in same space. Ch 2, 3 dc in same space. *Ch 2, (3 dc, ch 2, 3 dc) in next ch 2 space. Rep from * 4 more times. Ch 2, join w/ sl st to 3rd ch of beg ch 3. (6 shells, 12 ch 2 spaces)

Rnd 3: Sl st to ch 2 space. Ch 3, 2 dc in same space. Ch 2, 3 dc in same space.*Ch 2, 3 dc in next ch 2 space. Ch 2, (3 dc, ch 2, 3 dc) in next 'shell', or corner space. Rep from * 4 more times. Ch 2, join w/ sl st to 3rd ch of beg ch 3.

Rnd 4: Sl st to ch 2 space. Ch 3, 2 dc in same space. Ch 2, 3 dc in same space. *Ch 2, 3 dc in next ch 2 space. Ch 2 (3 dc, ch 2, 3 dc) in next corner space. Rep from * 4 more times. Ch 2, join w/ sl st to 3rd ch.

Repeat round 4, changing colors if you want a stripe. For this sweater, I switched to green in rounds 5-6, then back to yellow.

When you have 9 groups of 3 dc groups in between the corners, fasten off.


This is how it looked like she joined the back:
Either sl st to corner, or if you have already fastened off, join yarn in corner. Ch 3. 2 dc in same space. Ch 1, holding second hexagon with wrong sides facing, sc in corner space of second hexagon. Ch 1, 3 dc in same space of first hexagon. *Ch 1. Sc in next ch 2 space of second hexagon. Ch 1, 3 dc in next ch 2 space of first hexagon. Repeat from * across. When you get to the last corner space, just do 3 dc in first hexagon, ch 1, sc in second hexagon. Fasten off.


Okay, for the sleeves, this is what she did: (Join like I just stated). Now, at sleeve edge, join w/ a sl st. *Ch 3, Sc in ch 2 space. Repeat from * to space marked, ending w/ a sc in space marked. Fasten off. Do the same for the second sleeve. (For the second sleeve, I joined in the space marked- by the neck edge, and worked to the sleeve edge so it was all on the right side.) I will come back and add more and redo all my pictures to match everything when I am done.

Collar: Join w/ a sl st in corner space of left side. Ch 3. *Dc in each dc, 2 dc in ch 2 space. Repeat from * around whole neck edge. In last corner space, do 1 dc. Turn work.

Row 2: Ch 3, dc in same space as ch 3 (increase). Dc in each dc acros to last dc (beg ch 3 of previous row), 2 dc in top ch of beg ch 3. Turn work.
Row 3-5: Repeat row 2. Fasten off @ end of row 5.

Sleeve: With sleeve laying flat, find halfway point from ending off point. (You will be starting at the bottom of the sleeve, in the middle of row, so to speak... hope that makes sense...)

Join w/ sl st in 3rd dc of a 3 dc group to left of 'halfway point'.

Round 1: Ch 3. *Dc in ch 2 space. Dc in 2st dc of 3 dc group, skip 2nd dc, dc in 3rd dc, rep from * around, working a dc in each ch 2 space by joinging seam. To end, dc in 1st dc of last 3 dc group. Skip last 2 dc, join w/ sl st to top of beg ch 3.
*Note for round 2 (You will be doing fpdc and bpdc around stitches round 1, hopefully you know how to do this but I will *try* to explain it a little.... don't know if it will be much help, but...)

Round 2: Putting hook in back of 1 st dc of round 1, make a sl st around dc, ch 3. Now put hook around back of next dc, make a dc around this stitch. *Fpdc around next st, bpdc around next st, rep from * around. Join w/ sl st to beg ch 3.

Round 3: Going around 1st dc of prev round, sl st. Ch 2. Fpdc around fpdc's, bpdc around bpdc's. Join.

Round 4: Ch 1, sc in 1st st. Sc next two together, sc in next stich; ending w/ sc in last 2 sts. Join and fasten off. (I added this round to kind of bring the sleeve edge in more. It seemed too loose to me.) Repeat for second sleeve.

Bottom edge: With bottom of sweater facing you, join w/ a sl st to left handed corner space (left side of sweater front). Ch 5. *3 dc in ch 2 space, ch 2. Repeat from *; when you get to the back seam, do 3 dc's over the back two spaces. Repeat as you were, ending w/ ch 2, dc in corner space. Turn work.

Row 2: Ch 3. 2 dc in same space. *Ch 2, 3 dc in next ch 2 space. Repeat from *, ending w/ 2 dc in last space, and dc in 3rd ch of beg ch 5.

Now she made a tie (chains) around the neck and wove it through the last row of granny type stitches. She also did a Solomon's Knot type edging all around bottom edge and sides of front edges of sweater. I think I am going to do a simple sc edging, and make a loop at top neck edge to button the top part.


YOUTUBE VIDEO HERE


Crochet flowers


POST HERE


Wednesday, 7 October 2015

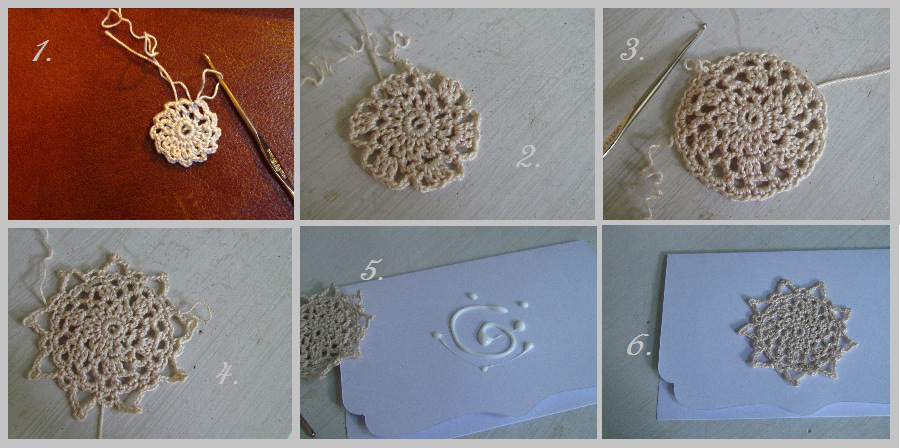
Lace Greeting Card Tutorial

Posted by Melody on May 27, 2012

READ ORIGINAL POST HERE


http://www.melmariadesigns.com/lace-greeting-card-tutorial/


Ch 6, join with sl st to form ring

Rnd 1: Ch 1, 12 sc in ring, join to first sc.

Rnd 2: Ch 4, (counts as sc, ch 3), *sc in next sc, ch 3, repeat from * around, sl st in 1st ch of beg ch-3.

Rnd 3: Sl st into ch-3 sp, ch 1, sc in same sp, *ch 3, sc in next ch-3 sp, repeat from * around, join with sl st in first sc.

Rnd 4: Sl st into ch-3 sp, ch 1, sc in same sp, *ch 3, 3 dc in next ch-3 sp, ch 3, sc in next ch-3 sp, repeat from * around, join with sl st in first sc.

Rnd 5: Sl st in next ch-3 sp, ch 3, *sc in center dc of 3-dc, ch 3, (sc in ch-3 sp, ch 3) twice, ch 3, repeat from * around, join with sl st in first sc.

Rnd 6: Sl st in next sp, ch 1, 3 sc in same sp, * 3 sc in next sp, repeat from * around, join with sl st in first sc.

Rnd 7: Ch 1, sc in same sc as join, *ch 3, skip next sc, sc in next sc, ch 6, sl st in 3rd ch from hook, ch 3, skip next 3 sc, sc in next sc, repeat from * around, join with sl st in first sc. Fasten off and weave in ends.

Dot and swirl some glue on the front of the card and press the doily to the card, pulling with your fingers to flatten it out completely.